DESIGN GUIDE
Air Bushings Design and Installation Guide
This guide provides engineering best practices for the design, preload configuration, and installation of OAV Air Bushings. Follow these recommendations to achieve optimal performance, stiffness, and accuracy.
01
Air Bushing Mounting Methods
Typical configurations consist of one shaft and one bushing, or two parallel shafts with two to four bushings.
Generally, the air bushings are inserted inside of a mounting block or inside the bore of a customer-designed housing. The customer-designed housing must be designed in a way such that the air supply is forced into the air ports of the bushings.
The three methods of installation are epoxy, o-rings, or a light-press fit. OAV mounting blocks allow for the epoxy and o-ring methods of installation. In most cases it is recommended to design using o-rings, because o-rings have self-aligning features that can be readjusted. Air bushings rely on the straightness of the shaft. Design so that the deflection/displacement of the shaft is minimal.

Design & Installation Guides
Linear Guide Air Bearings
02
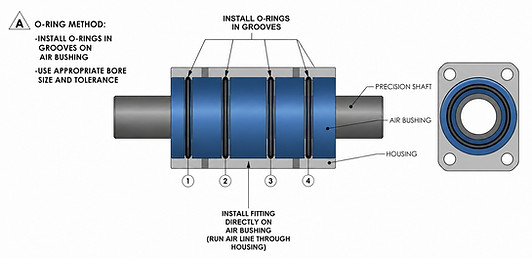
Housing Installation - O-Rings
When using O-rings, the bearing is retained and aligned through elastomeric compression within the mounting bore. This method allows for slight self-alignment while maintaining proper air film performance.
-
First do a quick visual inspection to ensure that there are no sharp edges in the bore of the mounting block. The o-rings provide a very tight fit and if they get damaged, they will not work properly.
-
Lubricate the O-rings and surfaces with alcohol.
-
Press-fit the bushing inside the mounting block.
-
Insert the shaft and apply the air pressure. 30 PSI is enough to test the bushing without any load being applied.
-
Use proper alignment. If two shafts are used side-by-side, it is best to use gages to assure that the shafts are at an equal distance from both ends. Parallelism is crucial for optimal performance of the air bushings.
03
Housing Installation - Epoxy
If epoxy is used, make sure that the epoxy grooves on the bushings can be accessed with a syringe.
-
Clean the surfaces with alcohol.
-
Slide the air bushing into the mounting block, and the shaft into the bushing.
-
Align the shaft(s) with the best parallelism possible. If two shafts are used side-by-side, it is best to use gages to ensurethat the shafts are at equal distance at both ends. Parallelism is crucial for the performance of the air bushings.
-
Turn the air supply on at 30 PSI and do not apply any load to the bushing.
-
Use a syringe to apply the epoxy through the syringe holes on the mounting block until the epoxy fills the epoxy grooveson the bushing. Make sure that the air port on the bushing lines up with the air port on the mounting block.
-
Keep the air supply on at 30 PSI until the epoxy cures.
-
Epoxy installation should only be performed after shaft alignment is confirmed

04
Housing Installation - Light Press-Fit Method
The light press-fit method secures the thrust air bushing within the housing using controlled interference. This method provides a rigid and permanent installation when proper tolerances are maintained.
-
Clean the surfaces with alcohol.
-
Light-press fit the air bushing into the mounting block, and the shaft into the bushing.
-
Align the shaft(s) with the best parallelism possible. If two shafts are used side-by-side, it is best to use gages to ensure
that the shafts are at equal distance at both ends. Parallelism is crucial for the performance of the air bushings. -
Make sure that the air port on the bushing lines up with the clearance hole on the mounting block.
-
Install the air fitting directly into the air bushings as shown above.

05
Mounting Alignment
Proper alignment of the mounting blocks is essential to ensure smooth operation and optimal bearing performance. During installation, mounting blocks should be loosely positioned to allow for fine adjustment while the shaft, O-rings, and air system are engaged. This allows the system to naturally align under operating conditions. Once correct alignment is achieved and verified, all mounting hardware should be securely fastened to lock the system in place. Improper alignment can lead to increased friction, reduced stiffness, and premature wear.